Hello, friend! Pull up a chair, because today I am sharing my definitive Anzac Slice Recipe. This recipe is more than a set of instructions; it is a promise. A promise of the most comforting classic oat slice I know — A recipe I, Mojo, have tested and perfected 14+ times. Imagine that incredible, nostalgic aroma of toasted oats and warm golden syrup. We are about to create a perfectly chewy, buttery Anzac Slice with rich caramel notes. Trust me. It is pure delight.
Ultimate Chewy Anzac Slice Recipe Card
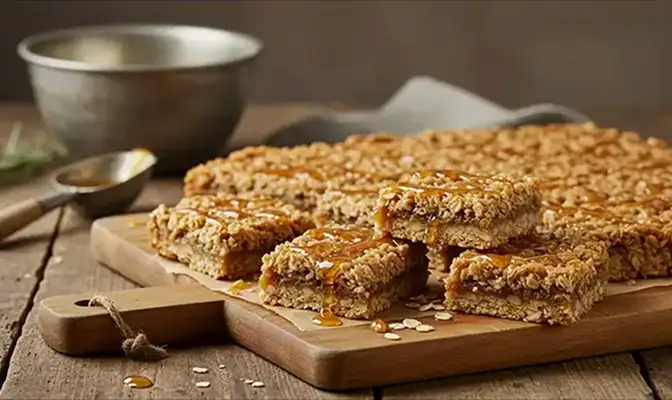
A timeless classic, this Anzac slice is perfectly chewy, rich with caramel notes, and packed with wholesome oats and coconut. This is a melt-and-mix marvel that is astonishingly simple and delivers every single time.
Equipment
Ingredients & Substitutions
| Ingredient | Substitute |
|---|
Instructions
Nutrition Information (per slice)
Why This Anzac Slice Recipe Works
Here is why this is the only Anzac Slice Recipe you will ever need. The secrets are in science, my friend. Understanding them is what makes a good slice, a great one.
- The Magic of Bicarbonate Soda: That beautiful fizz when you add the bicarb is not just for show. It creates a lighter crumb and that glorious caramelization, which is essential for the perfect texture of this classic oat slice.
- The Role of Golden Syrup: Golden syrup is our moisture keeper. It is the key ingredient that guarantees the wonderfully chewy result this particular slice is famous for.
- The Power of Brown Sugar: Brown sugar provides a deep, rich, caramel flavour that white sugar simply cannot match. It is fundamental to the classic taste of an authentic Anzac Slice.
- The Melt-and-Mix Method: We melt the butter; we don’t cream it. This is a deliberate choice. This method limits gluten development, which guarantees the tender, dense bite that defines this iconic treat.
- The No-Egg Wonder: The original recipe was designed to last. Leaving out eggs is why this slice has a fantastic shelf life and its signature, satisfyingly dense texture. This is a core part of the Anzac slice story.
Step-by-Step Instructions for This Anzac Slice Recipe
Let’s make the ultimate Anzac Slice Recipe. Follow my lead, step-by-step. You cannot go wrong.
1. Building the Dry Foundation
- First, grab your largest mixing bowl.
- Add the heart of our recipe: the oats, flour, brown sugar, and coconut.
- Whisk them together thoroughly.
- This simple step ensures every single bite of your Anzac slice is perfectly balanced.
(Process Photo: A close-up shot of the whisked dry ingredients in a rustic bowl, showing the varied textures.)
2. Melting the Liquid Gold
- Now, take a small saucepan.
- Add the butter, golden syrup, and water.
- Melt it gently together over a low heat.
- This fragrant, liquid gold is the very soul of this classic Anzac Slice Recipe.
(Process Photo: The glossy, golden liquid swirling in the saucepan over a low flame.)
3. Activating the Magic
- Remove the saucepan from the heat. This is important.
- Add the bicarbonate of soda all at once.
- Stir it in and watch it fizz and foam!
- This beautiful reaction is the secret to a perfect texture.
(Process GIF: A short, dynamic clip showing the moment the bicarb is added and the mixture instantly froths up.)
4. Combining the Elements
- Pour that glorious, frothy liquid into your bowl of dry ingredients.
- Fold it all together gently with a spatula.
- Do not overmix. A light touch is the key to a tender Anzac slice.
(Process Photo: An action shot of the frothy liquid being poured into the dry ingredients.)
5. The Firm Press
- Tip the mixture into your prepared baking tray.
- Spread it out evenly into the corners.
- Now for a crucial step: press it down firmly.
- Really compact it. This ensures your Anzac Slice keeps its shape.
(Process Photo: An overhead shot focusing on a spatula pressing the mixture firmly into the lined tray.)
6. The Golden Bake
- Slide the tray into your preheated oven.
- Bake for 20-25 minutes.
- You are looking for a deep, golden-brown top.
- Your kitchen is about to smell absolutely incredible.
(Process Photo: The Anzac slice in the oven, glowing a perfect golden brown.)
7. The Crucial Cool-Down
- Here comes the hardest part: patience.
- Let the Anzac treat cool completely in the tin.
- Do not be tempted to slice it while it’s warm!
- This final step is essential. It allows the slice to set properly, guaranteeing the clean, chewy squares this recipe promises.
(Process Photo: The fully baked slice, cooled and ready for cutting in its tray.)
Mastering Your Anzac Slice Recipe: A Guide to Chewy vs. Crunchy
Here is how you master the final texture of your Anzac Slice Recipe. I promise you, these small, deliberate adjustments put you in complete control of this iconic biscuit slice.
Feature | For a CHEWY Slice (My Personal Favourite!) | For a CRUNCHY Slice |
| The Sugar | Rely on brown sugar. Its molasses content is the secret to moisture retention and that perfect, satisfying chew. | Swap half the brown sugar for caster sugar. Its lower moisture creates a more brittle, crisp finish. |
| Baking Time | A slight under-bake is key. Pull it from the oven when the edges are golden but the centre is soft. It will set perfectly as it cools. | Increase the baking time by 3-5 minutes. You’re aiming for a deep, uniform golden brown across the entire Anzac slice. |
| The Oats | The structure demands rolled oats. Their thick, hearty texture is essential for this classic Anzac slice. | Use quick oats for a finer, more delicate crunch. They create a sandier, more uniform texture. |
| The Thickness | Use a smaller tin. A thicker slice protects the centre, keeping it wonderfully soft and moist. | Use a larger tin. A thinner slice allows heat to penetrate fully, ensuring a crisp bite. |
| The Cool Down | My secret weapon: cool it in the tin. This traps the steam, locking in all that precious moisture. | After 10 minutes, cool it on a wire rack. The air circulation wicks away moisture for maximum crunch. |
Recipe Variations & Innovations
Once you’ve mastered the classic, you can start having fun! This slice is a wonderfully versatile base.
Classic Twists
- Chocolate Chip: After mixing, allow the mixture to cool for a few minutes, then stir through 150g of chocolate chips before pressing into the tray.
- Fruit & Nut: Add a generous handful of chopped dried apricots, cranberries, or sultanas along with the dry ingredients for a fruity chew.
- Coconut-Free: If you’re not a fan of coconut, simply replace it with an equal amount of rolled oats or flour.
Gourmet Variations
- Brown Butter Anzac Slice: This is a game-changer for flavour. Before adding the golden syrup, melt the butter and continue to cook it, swirling the pan, until it foams and you see nutty brown specks at the bottom. This gives the slice an incredible, nutty depth.
- Salted Caramel Anzac Slice: Prepare the Anzac base as directed and press it into the tin. Prepare a simple caramel by melting a can of condensed milk with brown sugar and butter, then pour it over the base. Top with a crumble made from the same Anzac mixture and bake.
- Spiced Anzac Slice: Add ½ tsp of ground cinnamon, ¼ tsp of ground ginger, and a pinch of cardamom to your dry ingredients. The warm spices pair beautifully with the oats and syrup.
Fully Tested Dietary Variations
- Gluten-Free Anzac Slice: Swap the plain flour for a quality gluten-free plain flour blend. Ensure your rolled oats are certified gluten-free, as they often are cross-contaminated.
- Vegan Anzac Slice: The original recipe is already egg-free! Simply substitute the butter with a good quality vegan butter block or coconut oil for a fantastic result.
Troubleshooting Your Anzac Slice (Common Problems & Solutions)
Problem | Why It Happened | The Mojo Fix |
| My Anzac slice is just a crumbly mess. | The mixture was too dry, or it wasn’t pressed down firmly enough in the tray. | You must press the mixture down very firmly. This is a crucial step for a cohesive slice with this specific recipe. |
| My slice is rock-hard. | Over-baking is the enemy of a chewy, perfect Anzac slice. | Pull your slice from the oven when it’s just golden. It will continue to set perfectly as it cools. |
| My Anzac slice feels greasy. | The butter wasn’t fully incorporated into the other recipe ingredients. | Take an extra moment to fold the mixture together thoroughly. A proper mix is key to the success of this bake. |
| I can’t get the slice out of the tin! | You likely forgot my tip about using a baking paper “sling.” | My method for a perfect slice always includes a sling. It makes lifting the cooled treat out incredibly easy. |
| The edges are burnt but the middle is raw. | Your oven is running too hot, a common issue for this type of slice. | For this particular recipe, try turning your oven down by 10°C and baking it for a little longer. |
| The flavour of my slice is a bit flat. | Your ingredients, especially the oats or golden syrup, is not be as fresh as they could be. | Here’s my secret: add a tiny pinch of salt. It makes all the classic flavours in this recipe truly sing. |
| The bottom of my Anzac slice is soggy. | The liquid butter and syrup mixture has pooled at the bottom of the tray. | Be sure to fold the batter from the bottom up. This ensures the mixture for your perfect oat slice is completely combined. |
Pro-Tip: My number one tip for this Anzac Slice Recipe? Get an oven thermometer. It is the single best tool for consistent, perfect results every time.
The Story of the Anzac Slice
This slice isn’t just a treat; it’s a piece of history. The original Anzac biscuit was born out of necessity during World War I. Wives, mothers, and women’s groups in Australia and New Zealand wanted to send food to their soldiers abroad. They needed something that could survive the long, unrefrigerated journey by sea.
The ingredients were chosen for their long shelf life: rolled oats, flour, sugar, and golden syrup. Notably, eggs were omitted as they would spoil. The name “Anzac” is protected by law in Australia and New Zealand to honour the memory of the Australian and New Zealand Army Corps (ANZAC) soldiers, and its use on commercial goods is strictly regulated. On April 25th, both nations commemorate Anzac Day, a time to reflect on the sacrifice of those who served and to remember their courage. It is a solemn and significant day for both countries. Baking these biscuits—or this delicious slice—is a way of honouring that legacy of love and remembrance.
Anzac Slice Recipe Ingredient (Deep Dive):
- Oats: For this classic oat slice, you must use rolled oats. Their hearty structure is what provides that satisfying, signature chew. Trust me, using quick oats will result in a pasty, dense slice, and we want that perfect texture.
- Coconut: This Anzac Slice Recipe specifies desiccated coconut for a reason. It’s a fine, dry flavour carrier that dissolves beautifully, creating a uniform crumb in this delicious slice.
- Brown Sugar: The deep, caramel notes come from brown sugar. Its molasses content is our secret weapon for moisture retention and authentic flavour. It’s the primary flavour-giver.
- Butter: The flavour is carried by the fat. That’s why real, unsalted butter is essential. Melting it is a key part of this melt-and-mix marvel, ensuring every oat is coated in its richness.
- Golden Syrup: The very soul of the Anzac Slice Recipe. Its iconic, buttery flavour is unmistakable. As an invert sugar, it’s our secret for retaining moisture, ensuring a perfectly chewy texture.
- Bicarbonate of Soda: The quiet hero. This leavening agent activates when it meets the hot syrup. That fizz creates a more tender crumb and helps the Anzac slice achieve its beautiful, even caramelization.
- Plain Flour: This is our binding agent. It provides the essential structure that holds all the other ingredients together, creating a biscuit slice that cuts cleanly.
- Water: The humble catalyst. This small amount of liquid is crucial for dissolving the sugars and helping the Bicarbonate Soda (also called – bicarb soda) work its magic. Never underestimate the small details.
- A Pinch of Salt: My secret for truly exceptional flavour. This tiny pinch of salt doesn’t add saltiness; it works by balancing the sweetness. This allows the buttery caramel notes to become richer and more vibrant, elevating the entire slice.
Substitutes Ingredients (Deep Dive):
While I stand by this recipe as written for the ultimate result, I know that sometimes you have to work with what’s in your pantry. Here are my trusted swaps, but remember, my friend, changing an ingredient will change the final slice!
- For Rolled Oats: In a pinch, you can use quick oats. Be warned, though: you will lose that signature, hearty chew. The slice will have a much softer, denser, and finer texture.
- For Desiccated Coconut: If you only have shredded or flaked coconut, they will work just fine for a slightly coarser texture. If you’re not a fan of coconut at all, simply replace it with an equal amount of rolled oats to double down on that oaty flavour.
- For Brown Sugar: This is a tough one, as brown sugar provides essential moisture and that deep caramel taste. You can use caster or white sugar, but the flavour will be much simpler. To add back some richness, a teaspoon of molasses added to your butter mixture can work wonders.
- For Unsalted Butter: If you only have salted butter, it’s a perfect substitute; just make sure you omit the extra pinch of salt from the recipe. For a vegan version, a good quality block-style vegan butter is a fantastic swap.
- For Golden Syrup: I’ll be honest, nothing truly replaces the iconic flavour of golden syrup. However, in a real baking emergency, light corn syrup, honey, or even maple syrup can be used. They will provide the needed chew, but they will absolutely change the classic taste of your slice.
- For Bicarbonate of Soda: No bicarb? You can use baking powder, but you must use three times the amount (1 ½ teaspoons of baking powder). You won’t get that same magical fizz when you mix it in, but it will save your slice from being a dense brick.
- For Plain Flour: For a gluten-free version, a quality 1-to-1 gluten-free flour blend is a direct and reliable swap. If you only have self-raising flour, use it, but be sure to leave out the bicarbonate of soda entirely.
- For Water: This one is simple: it’s just water! However, if you wanted to experiment, you could use milk for a slightly richer crumb, though it’s not a traditional choice.
- For a Pinch of Salt: This is my secret for the best flavour, but the slice will still be completely delicious without it. If you’re using salted butter, this is the first thing you should leave out.
Storage, Freezing & Gifting Anzac Slice
This slice keeps incredibly well, making it perfect for preparing ahead.
- Storing: Store your Anzac slice in an airtight container at room temperature. It will stay fresh and delicious for up to a week.
- Freezing: This slice freezes brilliantly! Cut it into individual portions, wrap them tightly, and place them in an airtight container or freezer bag. They will last for up to 3 months. To thaw, simply leave them at room temperature for a couple of hours.
- Gifting: Who wouldn’t love to receive a batch of homemade Anzac slice? For bake sales or gifts, wrap individual slices in wax paper and tie with kitchen twine. You can stack them in a lovely tin or a simple box.
More Ways to Use Anzac Flavours
Don’t let the deliciousness stop at the slice! The raw mixture and the baked slice can be used in so many creative ways.
- Anzac Crumble Topping: Instead of baking it as a slice, use the raw Anzac mixture as a crumble topping for baked apples or rhubarb. The buttery oats and coconut create the most incredible crunchy lid.
- Anzac Cheesecake Base: Crush your baked Anzac slice with a little more melted butter and press it into a springform pan. It makes a flavourful, textured base for a no-bake cheesecake.
- Anzac Ice Cream Mix-In: Chop your baked slice into small chunks and fold them through slightly softened vanilla ice cream. Refreeze, and you have a custom-made, incredibly delicious dessert.
Anzac Truffles: For a truly decadent treat, crumble the baked slice and mix the crumbs with a little cream cheese or condensed milk until the mixture holds together. Roll into balls, chill, and then dip in melted chocolate.